Showing posts with label House Project. Show all posts

Monday, March 23, 2015

How to Start Seeds (and More!)

Hi all! When I saw this post about gardening, I knew I had to share it with you!  Since I had recently shared some of my own gardening tips, I thought this was a great follow up.  It touches base on deciphering the different meanings when looking for seeds (i.e. hybrid, heirloom, organic...), seed storage and expiration, and how to start seeds!  

If you haven't ordered seeds yet, SeedsNow has a great variety of GMO-Free Heirloom seeds for just .99 cents!!  Get yours here.

Take a look at  the graphics below and then let me know what you learned in the comment section.  I love to hear from my readers!

Happy Gardening!!!


Source: Fix.com

Wednesday, February 11, 2015

Goodbye to our Pink Kitchen & Cover Plug Review

We have been in our house for a year now (+ a month or so).  And our kitchen still has pink walls...or it did....until Monday.  Originally it had pink carpet, pinks walls, and pink counters.  The carpet we replaced shortly after moving in (because it really needed it) with laminate that we found at Ollie's Bargain Outlet for a steal!  Then we got paint this past summer...but with me being fairly pregnant and having a million other things to get done before baby, we just never got to it.  We finally decided this weekend that something must be done.  And we got to work!

Here is my lovely pink kitchen:

Okay....so the pink isn't horribly obvious, but it doesn't exactly go with the flow...
Nice right?

For our new paint, we chose a green color called Spanish Olive.  And here are the results:

Love, love, LOVE!

We have had the primer over spots on the  pink for a looong time...it desperately needed paint.  Much better right?

I am in love with how it makes the cupboards look so much nicer.  I feel like I have a brand new kitchen!  :D  Now we just have to work on those counter tops...

Here is a neat little extra tid bit in our remodeling process: The Cover Plug.


Each box comes with two covers in an ivory color (like most outlets).

The first thing that I love about the CoverPlug is that it is made in the USA!
And the second thing I love is that it is a wonderful alternative to putting those silly plastic things in open outlets.  This looks so much nicer!

Here is a view of the back so you can see how it inserts into the outlet:

Two pegs insert into the bottom holes in the outlets.

The last thing that I really love about the CoverPlug is that it can be painted!!  So even though I can clearly see something is there, it blends into the wall and makes it less noticeable for little eyes and hands.  And much less of an eye sore!  There is an outlet in the kitchen that we never use, so this was the perfect solution!

...and now it's green...or...um...I mean Spanish Olive!

Painting  it was fairly easy since you can hold the prongs on the back.  It did need two coats.  But with a really good brush, that might not be necessary.  I do feel like it might chip easy, but I don't foresee the need to be taking it on and off too much.

Here is how it looks in action:

Noticeable but not super noticeable.  :)

The CoverPlug

The great thing?  Our nursery is the same color as the kitchen, so I painted both the CoverPlugs this weekend and I have one for when we move the crib out and expose an unused outlet in that room.  Making it safe for an exploring little one.  Out of sight, out of mind.

I definitely recommend the CoverPlug.  It is a pretty neat product!

You can find out more about CoverPlug at the following locations:


You can also purchase the CoverPlug at multiple locations including Etsy, Sears, or Amazong where it is only $8.50.

Tuesday, July 15, 2014

House Project: Vanity Hardware Makeover


So awhile back when I showed you how I antiqued our bathroom cupboards, I noted in the post that I would also show you how I redid the hardware.  Finally getting around to that!  

Unfortunately, I didn't get a before pic.  Just envision black hardware with splotches of white paint, blue paint, and maybe a little cream paint....which may or may not have been my fault.

Yes, I did paint them a little bit while painting the cabinets cream.  But to be fair - they already had paint on them!  ;)

I wanted to see if we could get away with just cleaning the paint off so I looked to the internet for a solution.  Turns out all I needed was rubbing alcohol!  


I love finding easy fixes like this!


I let the handles and hinges soak for quite awhile (at least an hour).


Here they are soaking.  Like watching water boil....

And then started to rub/scrub them off.  At first, I panicked, because even the black was coming off.  But I loved the antiquey gold that was underneath.  However, in the end not all of the black was able to come off and Hubby really disliked it.  It was the wrong kind of "old."  lol. 


Not quite right...

But anywho...

In the end we got this Forged Hammered Chestnut Spray Paint  that had a bronze feel to it and went to town.  


Pretty awesome stuff!!

It worked out perfectly because we could then match the metal towel racks in the room with the vanity hardware.  And I LOVE how they look with the turquoise walls!  :)

The handles that started it all!
Don't you love the way it all goes together???  :D
~~~~~~~~~~~~~~~~~~~~~~~~~~~~~~~~~~~~~~~~~~

Have you ever used spray paint for a quick fix??


Sunday, May 18, 2014

House Project: Antiquing Bathroom Cabinet & Vanity

I promised a very, very long time ago that I would write this post.  And I keep my promises!  Even if it takes a couple of months...  I can blame it on the pregnancy right??  ;)

For quick instructions, jump to the bottom of the post - I condensed it all without the personal jargon.  :)

When we started talking about the house redo, we had to start thinking about what our "style" was.  We aren't modern.  We aren't primitive.  But we are somewhere in-between.  After a lot of time on Pinterest and then Houzz, we settled on "Rustic Contemporary."  We like things a bit earthy - leaves, trees, earth tone colors - which is pretty contemporary.  But we also enjoy the occasional antique and love a "worn" look - which brings us to the rustic half.  :)  

So, Hubby wanted to make sure, as a designer, that we had a cohesive look throughout the house.  Since our large bathroom was set to be fairly contemporary in color and style, we wanted to bring in something a little more rustic.  That's when we decided to antique the vanity.  The knobs were already vintage and I thought antiquing the vanity would be the prefect solution!

Well, it turns out that whatever the vanity is made of (not wood), didn't take well to the Valspar Antiquing Glaze** we purchased at Lowe's.  I did change the color of the vanity to make the vintage knobs pop but that is for another post.

Thankfully, because of an unfortunate leak, the smaller bathroom became a priority.  And I actually tried the glaze on the vanity and cabinet there first!  It turned out wonderfully!  :)

Here is what I started with (along with a matching vanity):


When we first looked at the house, I loved these - they just have SO much potential!  So I took the doors off and went to work.  The first step was to paint these cream instead of white.  Pretty uneventful....well, except for the fact that I forgot to remove the hardware.  Eek!

So don't forget to do that first when you're painting.  

To start the antiquing process (an optional step...though one I highly recommend) I sanded over everything, paying special attention to the edges and where the handles were located.  Here's a comparison of one drawer sanded and one not:


The drawer on the top is not sanded and the one on the bottom is.  The original white paint is showing through as well as the wood beneath that.  I was stoked that it was working so well.

Then I got out the rest of what I needed to finish the antiquing process:


Yep, that's it - a vacuum, a terry cloth, and Valspar Antiquing Glaze**. 

First vacuum off the sand.  Using a tac cloth here would probably be good, but we didn't have one and I wanted to get this done, so I just vacuumed over everything a few times and went to work.

Applying the glaze - intimidating right??  I was SO nervous about this...and just consoled myself by reminding me that another coat of paint would fix it if I messed up.  But it was SO easy.  Dab a terry cloth in the glaze (just a little bit...it goes a long way) and then rub it on to the surface.  It will stick more to the areas you sanded more.  But you can keep working with it until you get the desired look.  Here is one door done and one waiting:


Close up:


Crazy difference right??  I kept getting Hubbies attention (he was working on something else in our temporary work space...trim maybe??) to show him how awesome it was coming.  This was, by far, one of my favorite projects.  Because we are using that same cream color in a couple of other rooms - I have a few other antiquing projects in my future!  :)

Here is the finished project:


Here is a comparison photo just so you can get a better idea:


And here are some of the up close and personal details that I just love!


P.S. My next post will most likely be the quick redo I did on the hardware.  It was black and covered in paint before these pics were taken.  So be on the lookout for that!  :)

So, in the end, I highly recommend Valspar Antiquing Glaze**!  But only when you know you are working with wood...whatever our other vanity is made of, it just looked dirty.  There wasn't a grain for the glaze to find - it just looked smudgey.  Since you only use a tiny bit for each project, I have SO many more project ideas for this wonderful amazingness!  ;)  

Okay, so here is the condensed version:

Items Needed:

- Paint in the desired color(s) 
- Sand Paper
- Vacuum or Tac Cloth (or both)
- Terry Cloth
- Valspar Antiquing Glaze**

Directions:

1. If working with unpainted wood - paint the edges and easily worn spots (handles, etc.) with a color you would like to show through your finished product (I have a bit of white showing underneath our cream finish).

2. Let dry completely.

3. Paint over the entire piece with the desired finish color.

4. Let dry completely.

5. Sand over the entire piece (a finer grit is probably better, I just used what we had on hand).  Pay extra attention to areas that are easily worn - edges, anywhere there is a handle, etc.  The glaze will stick more where there is more sanding - so keep this in mind.

6. Use a vacuum cleaner or tac cloth or both to remove the debris from sanding.

7. Go back over any areas you think need to look more "worn."

8. Vacuum/tac cloth again.

9. Dip terry cloth in antiquing glaze (a little bit goes a LONG way).

10. Rub over the entire piece.  Get more glaze as needed.  It remains pliable for a while, so keep rubbing it around until you get the desired look.  Again - pay special attention to the "worn" areas.

11. Some sites recommend a sealer.  I suppose this depends on the material you are working with.  The glaze soaked right in to our cabinet and vanity and no matter how much I rubbed, it wasn't coming off, so we skipped this step.

12.  Admire your finished product.


**Another note - I did not receive this product for free.  In fact, I only got it because another blogger recommended it!  In other words, everything I said in this post was said because of how much the product impressed me!  :)


~~~~~~~~~~~~~~~~~~~~~~~~~~~~

Where could you use the wonderful magic of Valspar Antiquing Glaze??

Tuesday, May 6, 2014

House Project: Removing Wall Paper without Chemicals

I'm not a big fan of chemicals and because of this we make *almost* all of our own cleaners.  I only say almost because I make cleaners as we use up the ones we had previously bought.  And some of those can last a loooooooong time.  We initially started this to save money but the more I did my research and the more we talked about starting a family, I really liked the idea of being chemical free.  In my eyes - if it saves money AND it is better for you, than why not do it??  Sure, it isn't always convenient.  Yeah, it takes a little bit more time.  But for us, it is worth it.  I'm hoping to share some of my favorite home made cleaners with you in the near future! 

The first room we decided to tackle (after a little bit of *ahem* discussion) when we moved in to our home was the larger bathroom.

Here is a before shot:


 Wall border and carpet had to go.  Taking out the carpet will be in another post.  This post is all about the wall paper.  :)  Speaking of, we also ended up having to redo our small bathroom at the same time (discovered a leak) where there was also wall paper:


So, trying to be as chemical free as we can, and with us trying to have a baby - I really did not want to use a chemical-ridden wall paper remover.  So I turned to the internet.  I came across a blog post with a recipe that I have since lost (thought I pinned it, even checked my browser history...no where to be found - sorry I can't give credit where credit is due).  And I just knew we had to give her recipe a try.  And I'm SO glad we did because it turns out the couple days spent removing wall paper would have been part of my first few weeks of pregnancy.  :)

Here is the recipe:

1/2 cup of Vinegar
3 cups of Hot Water

After a little bit of trial and error, we found this to be the best process:

1. Score the paper/border with a knife or paint scraper
2. Spray down a small area with the vinegar solution
3. Let it soak for a couple of minutes (but don't let it dry)
4. Spray a little more
5. Scrape away!

Look at Hubby hard at work!  :)


But the real question is, how did it work?  

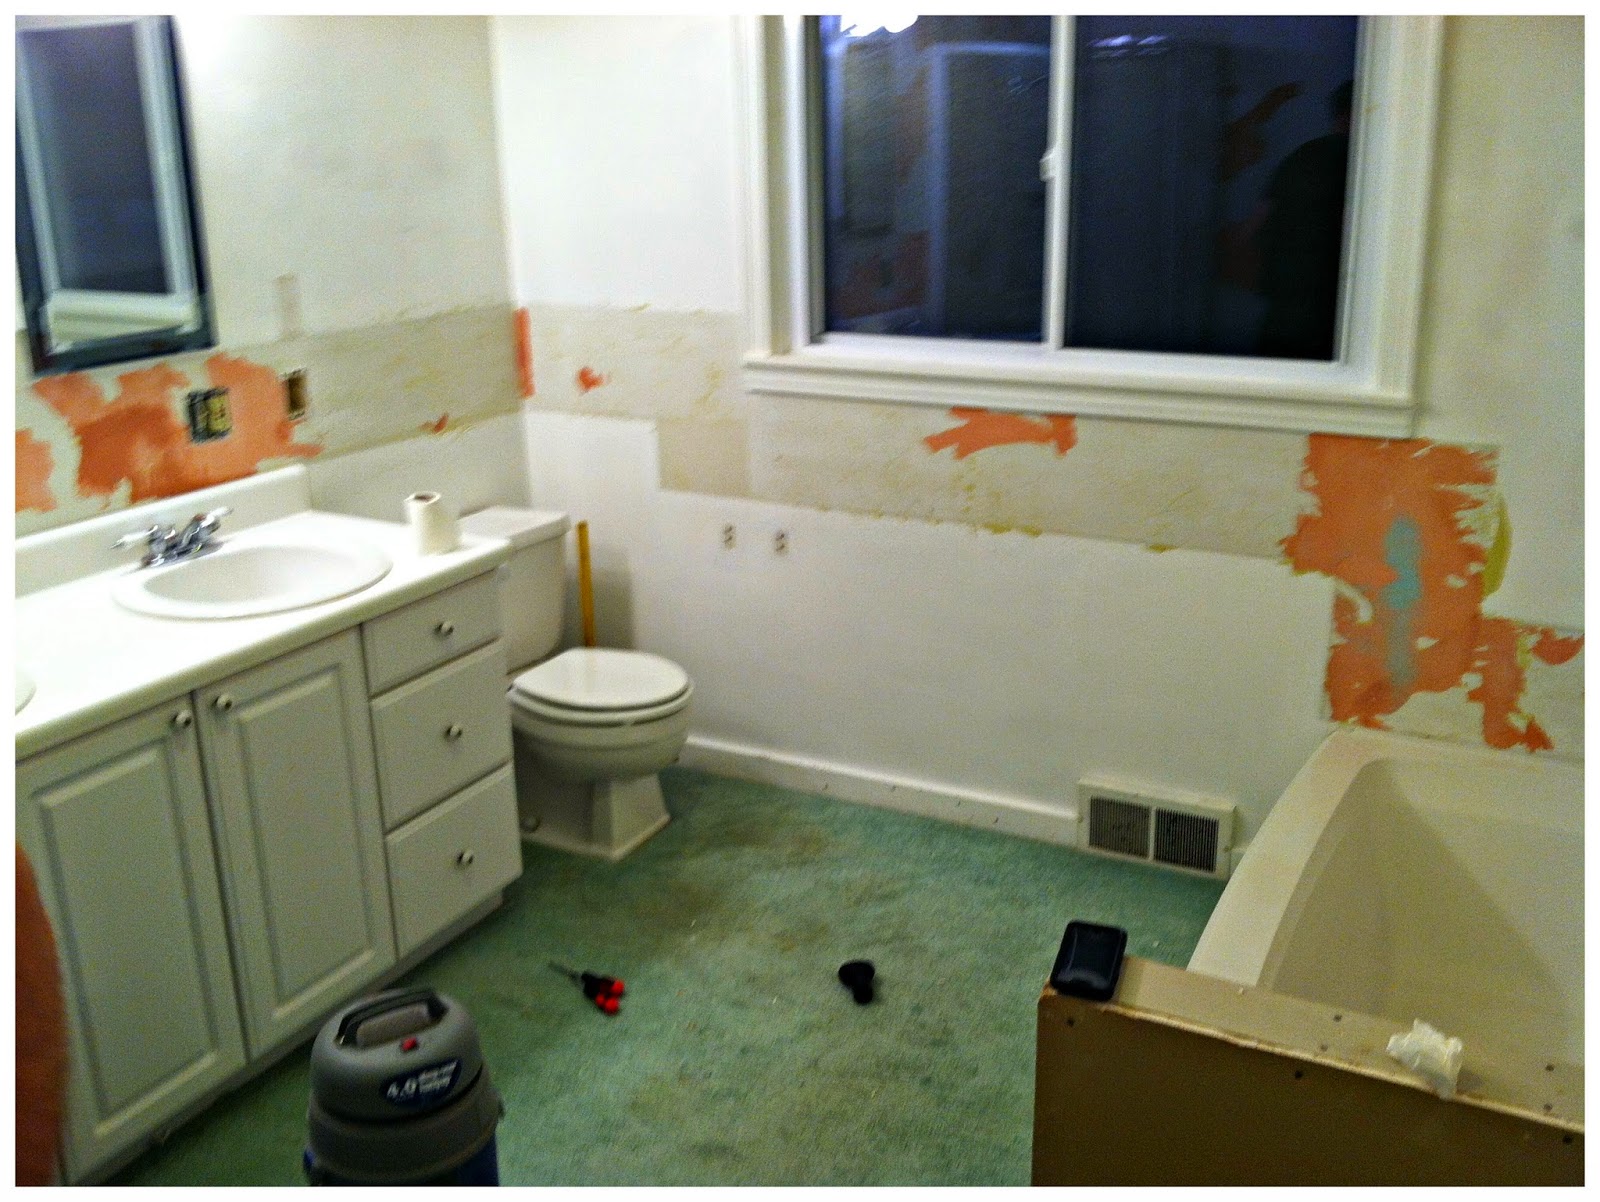
For the large bathroom, the border was water resistant.  This presented a little bit of difficulty.  The areas that were sprayed and resprayed and sprayed again because we were trying to keep everything moist, came off rather easily.  Unfortunately for us, it also pulled off about 4 layers of textured paint (which led to DIY task 2 - mudding and retexturing...all Hubby).  Look at all of the pretty colors:


 So, that being said, I'm not sure it was any easier with our homemade solution than without it.  And a chemical remover might have actually made it easier.  For this job, I give our home recipe a D.

HOWEVER, the smaller bathroom is a MUCH different story!  The wall paper border in that room was not water resistant.  And the vinegar solution was amazing!  It almost wiped right off!  Check out the mess my mom and I made:


 I honestly think it worked just as well as any store-bought remover would have.

So, for regular old wall paper, I give this home recipe an A+!

And just for fun, here is a pic of the large bathroom wall sans wall paper but before any other improvements.  Pretty isn't it?  ;)


I have taken pictures for almost every step of our remodel.  So stay tuned for more!  And once we actually finish this large bathroom, even though we've slowly been at it for 4 months, I will post a final before and after.  I think you will love it!